Heater Repair is an essential part of ensuring your home has the right temperature. It also provides energy efficiency and healthy indoor air quality.
Simple maintenance tasks like replacing air filters can be handled by homeowners, but complex problems may require professional help. A skilled technician can provide a long-term solution instead of temporarily fixing the issue.
It’s important to maintain your furnace, especially during the winter. A little bit of maintenance can keep your heating system running smoothly and avoid costly repairs in the future.
If your furnace isn’t producing warm air, it could be as simple as a dirty air filter or an incorrect thermostat setting. It can also be a sign of problems with the blower fan or limit switch. If your heater produces rumbling, squeaking or rattling noises, it’s probably time to call a professional for an inspection.
The first thing you should do if your furnace isn’t turning on is check the breaker. Even if your heater is fueled by gas, it still requires electricity to function. If the breaker was flipped off by accident, it will need to be turned on again before your heater can turn back on. Look for a standard wall switch on or near your furnace that looks similar to a light switch. It may have been flipped off by mistake when holiday decorations were removed or put away, or by someone who was doing other work in the area, such as installing new siding, painting, or blowing insulation.
After confirming that your furnace has power, check the blower motor and make sure the front panel is fastened in place. It’s easy for this to come loose over time, and it’s possible that your heater might not be able to start up if this is the case.
You should also relight your pilot light and check the gas valve to make sure it is on. Finally, you should check the exhaust flue to make sure birds or animals haven’t fallen in and blocked the line.
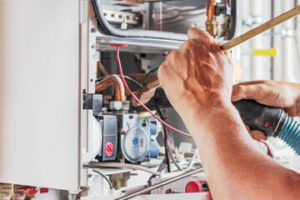
It’s not uncommon for people with a do-it-yourself spirit to attempt to fix their own furnaces, but this is usually a project best left to professionals. If you aren’t familiar with working on electrical systems or repairing small metal parts, a DIY job can lead to expensive damage and a serious fire hazard. It’s also not safe to attempt any repairs without proper training and tools.
Repairing a Water Heater
If your water heater is producing hot water but it’s not as hot as you want, the problem may be an incorrect temperature setting. It could also be a thermostat or heating element failure. In either case, you can usually solve the problem yourself without a professional.
Start by checking that the circuit breaker for the water heater is on and not tripped. You should also press the reset button on the high-temperature cutoff switch located above the upper thermostat. If the breaker trips, turn it off and on again. It may also be time to replace the heating elements.
Leaks at the top of the water tank often stem from loose pipe connections. These connections connect the inlet and outlet pipes, which supply and transport the water through the system. You can tighten these connections with a wrench, but be sure to wear gloves and eye protection when handling any kind of hot water.
The water heater has a temperature and pressure relief valve that’s designed to release steam or water in the event of a leak or overpressure. This valve is usually red and is located on the side of the water heater, next to the drain valve. It is a safety feature that should not be ignored, and it’s important to check it regularly for signs of leaking or corrosion.
If your hot water heater is leaking, it’s likely that the dip tube is corroded or cracked. This tube connects the water heater to the plumbing, and it’s responsible for directing the hot water to where it’s needed. The dip tube should be replaced with a new one if it’s corroded or damaged.
If your water heater has a thermostat, you can test it using a multimeter set to RX1 (resistance times 1) and a probe that is connected to the upper thermostat terminal or lower thermostat terminals, as indicated in the owner’s manual. The results should show a reading of 0 or 1, depending on the model and the terminals tested. If the readings are incorrect, you can adjust the thermostat settings by turning the dial clockwise to lower the temperature or counterclockwise to raise it.
Repairing a Tankless Water Heater
A tankless water heater has numerous advantages over a traditional tank-type unit, but this type of system isn’t immune to repair needs. Depending on the extent of the damage, you may require a full rebuild or replacement. In the latter case, a technician will remove your existing unit and install a new one in its place. During the process, your technician will make sure your unit is properly leveled, that thermal expansion tanks are pumped to the right pressure, and that gas sediment traps are in good condition.
The most common problem with a tankless water heater is that it fails to produce hot water. This could be the result of a malfunctioning heating element or burner, a closed water supply valve, a damaged thermostat or temperature sensor, or dirt/debris buildup on these components. In most cases, the solution is as simple as turning on the unit’s power and ensuring that the gas supply valve is open.
Another common problem with a tankless water heater involves leaking water. This issue can be extremely dangerous and costly if not addressed promptly. Before attempting any repairs, shut off the water supply to the unit by turning off the water valve found on the unit’s pipe connector. Then, turn off the power to the unit by locating and switching off its circuit breaker. Once both of these steps are taken, a plumber can assess the damage and provide appropriate repairs.
If you are experiencing a different issue with your tankless water heater, such as strange noises or an unpleasant smell, it’s a good idea to consult a professional to avoid further damage to the unit and any possible complications that might arise from an incorrect diagnosis. In most cases, it’s not uncommon for the odor to be caused by rust or sediment in the pipes, while noises can indicate that there are loose parts within the unit. This can often be corrected by flushing the unit according to the manufacturer’s instructions. Regular descaling and maintenance can also prevent mineral buildup and reduce noises caused by loose or damaged components.
Repairing a Heat Pump
There are plenty of heat pump problems that require the attention of a professional. Some of them overlap with central air issues (like thermostat problems), while others are unique to heat pumps (like broken reversing valves).
If your heat pump isn’t producing any hot air, the first thing you should check is the thermostat and the breaker box to make sure they’ve been turned on. If they are, but your heat still isn’t working, it might be an issue with the outdoor unit, and a technician will need to examine it.
Other common heat pump repair issues include weak air circulation, hissing sounds, squealing noises, and banging noises. Weak air flow could be caused by clogged fan blades, while hissing and squealing noises typically indicate that the motor bearings need to be replaced. Rattling and banging noises can also indicate a need for new ductwork, but this isn’t something you can fix on your own.
Another common heat pump problem is low energy efficiency. This can be due to an undersized or worn-out heat pump, but it can also mean that your ductwork is not properly insulated. An HVAC service professional can examine your ductwork and recommend a solution.
If the air coming out of your heat pump smells musty or burnt, it could indicate a mold infestation, a dead animal, or an electrical issue that requires professional attention. The odor can also be an indicator of a faulty fan, which can be replaced by a professional.
A heat pump that produces carbon monoxide can be a serious health hazard, and any leaks should be addressed immediately. Carbon monoxide can be fatal if inhaled, so you should have everyone leave your home until the levels return to normal.
The best way to prevent these kinds of issues is through annual maintenance. While it may cost a little more than doing nothing, the thousands you’ll save on repairs and the extra years your heat pump will last far outweigh the initial costs. Contact us to learn more about our comprehensive heat pump maintenance plans.